The Documentation team uses Jira, Github, Git Bash and Flare when updating online help content. This section describes that process, which is driven by the Documentation Status field in Jira.
Edit me
Technical Writers begin work on tickets as soon as possible after the ticket has made it past User Story review and completes the draft content in Flare.
When writing content, the TW communicates with PM/Dev as needed to ask questions, get clarification etc. The TW must provide information on the Jira ticket about where to find the updates in the Help system. It may be necessary to generate a Google document to show the updates. Both PM and the Peer Reviewer rely on this information, so it is vital that it is included.
Important: Always use Git Bash. Do not use the GitHub Desktop application.
Synchronize your release branch with the BackOfficeAssoc GitHub Repo
Warning: You MUST perform these steps each time you checkout a branch to ensure you are working in the latest copy of the release branch.
- In Windows-Explorer, right-click on your dsp-docs local folder and select Git Bash Here.
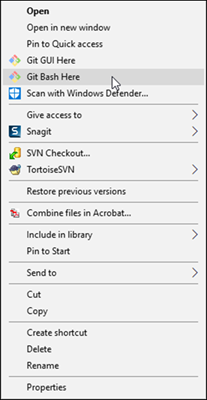
Right-click menu with Git Bash Here option - Switch to the release branch you are working in now, for example, develop_67.
Note: The git command to switch to the release branch is
git checkout <release branch name>. - Enter the git command,
git pull origin <release branch name>Tip: If at this point you wish to see a list of branches that are available in your local repo, enter the commandgit branch. All of the available local branches are listed.
Create a branch for your updates based on the release branch
- Navigate to the release branch in Git Bash if you are not already in it.
- Enter the command
git checkout -b \<new branch name\>Note: Name the branch after the JIRA ticket number if applicable. Use the naming convention DSP-NNNN. If changes are not related to a Jira ticket, give the branch a meaningful name, such as ‘releasenotesupdates’. - Open the project in Flare and make your updates and your updates are saved on the correct branch.
- When you finish your updates, save your changes and close Flare.
Commit updates locally and push them to the BackOfficeAssoc GitHub Repo dsp-docs
- Return to Git Bash or open a new session.
- Navigate to your repo, and make sure you are in the correct branch. It is in parenthesis after your prompt.
- Enter the git command
git statusto see all of the changes you have made.Note: If you do not see your changes, you may have forgotten to save or you are in the wrong branch. - Stage the updates for commit by entering the git command
git add .Note: Include the period in the command.Tip: Comments change from red to green after you stage them. - Commit staged updates by entering the command
git commit -m "<commit message that informs everyone what you have done>"Note: Do not use special characters in message. - Push your changes to the remote by entering the command
git push origin <new branch name>Tip: Now your new branch is visible on GitHub and available for others to access for review.
Open a pull request for a peer reviewer to review your work
- Go to GitHub.com and click the Compare and pull request button next to your recently pushed branch.
- Make sure the base is the current release branch you are working in and compare is your new branch name.
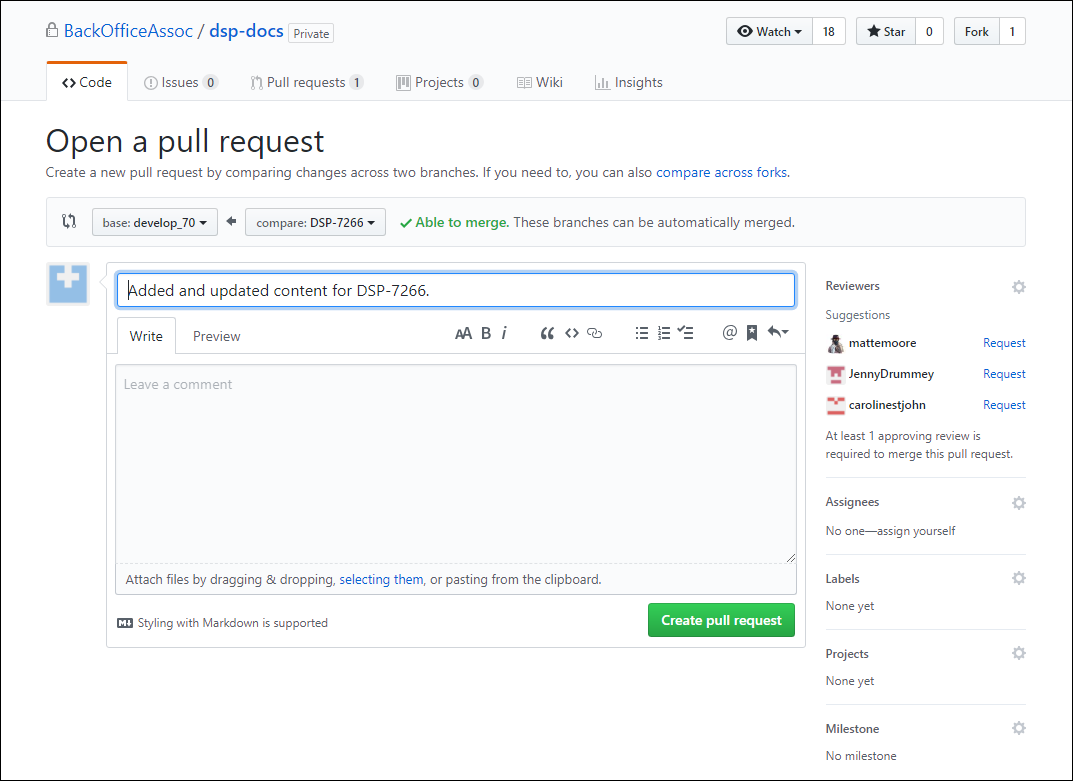
GitHub PR, base and compare branches - Add notes and a reviewer to the pull request and click the Create pull request button.
Note: Message the reviewers in Slack with link to PR.
- Add the PR URL to the Jira ticket.
- Update the Documentation Status on the JIRA ticket to Peer Review.